


Products Description
Quick Answer
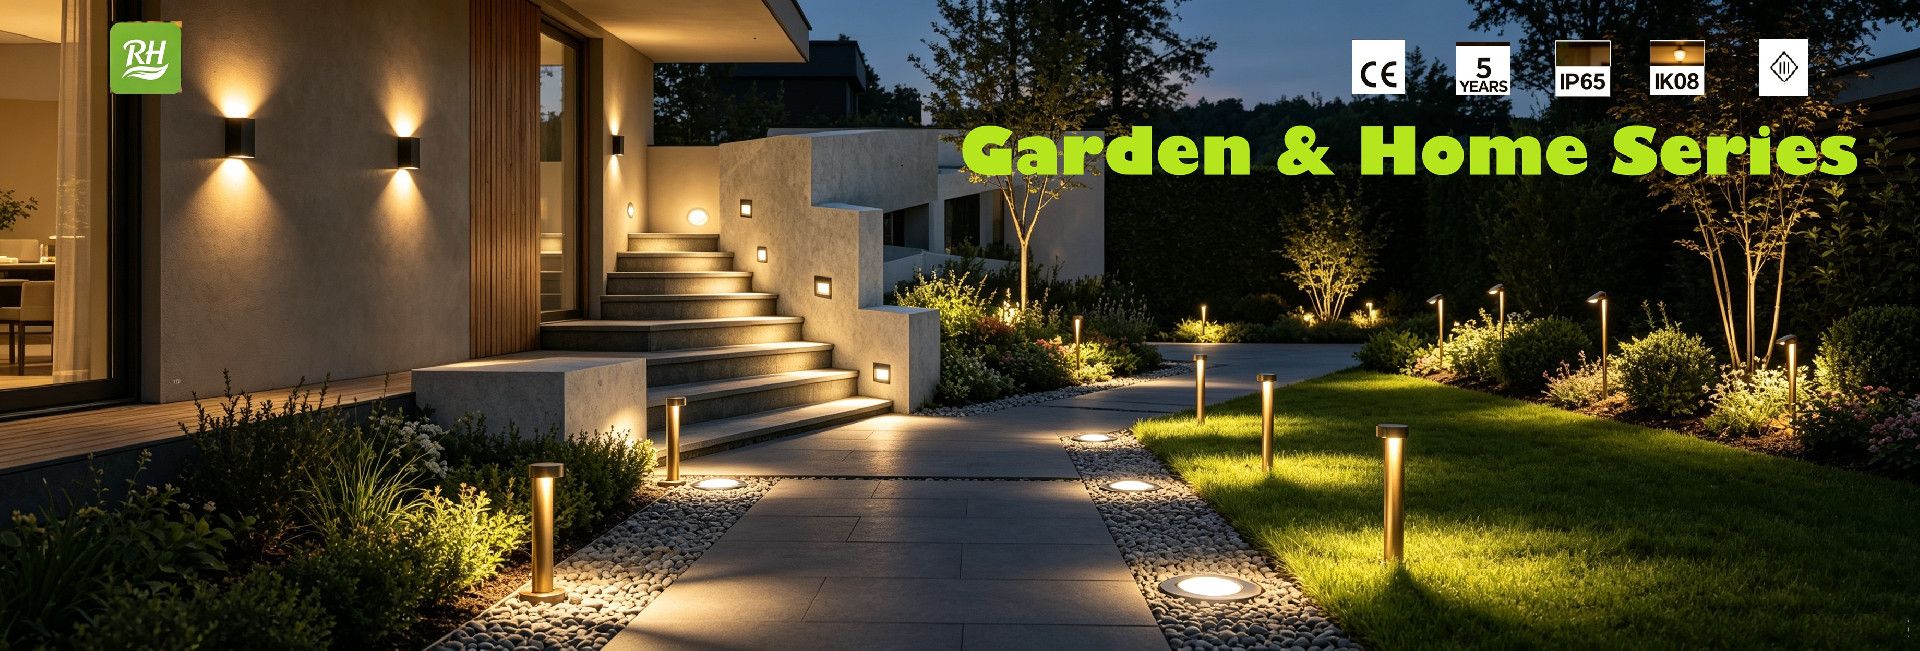
A 9W square garden spike light fits projects that need a compact square accent fixture for planting beds, small trees, low garden walls, path edges, signs and facade details. The safest selection method is not wattage alone. Start with the target size, throw distance, mounting position, viewing angle and glare direction, then confirm the final beam, color, control and project files for the selected version.
Source-Safe Product Positioning
This page is written as a planning guide for the existing 9W square garden spike route. Customer materials support garden spike lights, compact spot and flood categories, and spike or wall-mounted landscape spotlights for trees, sculptures and outdoor features. The final project configuration still needs confirmation before production use.
| Planning point | Fact-safe guidance | Buyer action |
|---|---|---|
| Product role | Compact square garden spike / landscape accent spotlight. | Use for focused accents rather than general area lighting. |
| Typical scenes | Planting beds, trees, low walls, path edges, signs, courtyards and facade details. | Share the target object and surrounding view direction. |
| Selection method | Choose by beam, distance, mounting and glare, not by wattage alone. | Mark each fixture zone on a layout or site photo. |
| Final details | Optical, color, control and project-file items depend on the confirmed version. | Request only the files needed for the selected configuration. |
Best-Fit Scenes
| Scene | Why a 9W square spike light may fit | Planning caution |
|---|---|---|
| Small tree or shrub accent | Enough focus for a modest target without dominating nearby planting. | Check the mature plant size, not only the current size. |
| Low wall or planter edge | The square head can visually align with modern hardscape lines. | Aim away from seated eye level and nearby windows. |
| Path-side feature | Works as an accent beside paths when path safety lighting is handled separately. | Avoid using a tight accent beam as the only path light. |
| Sign or small facade detail | Useful for short-distance highlight points and architectural edges. | Confirm target width before selecting beam spread. |
| Courtyard focal point | Can add a controlled highlight in layered outdoor lighting plans. | Balance it with softer surrounding light to reduce harsh contrast. |
Beam And Placement Planning
Beam spread and placement distance work together. A narrow beam can make a small object stand out, while a wider beam can make low planting or a short wall feel softer. The right answer depends on the target, distance and viewing angle.
| Target type | Beam planning logic | Placement check |
|---|---|---|
| Tall narrow plant | Use a more focused beam when the goal is vertical emphasis. | Test whether one side becomes too bright. |
| Low shrub or broad planting | Use a softer spread so the effect does not look like a hot spot. | Check spill light onto paths and seating. |
| Small sculpture or sign | Match the beam to the object width and viewing distance. | Confirm whether one or two aiming points are needed. |
| Low wall texture | Use grazing or angled light only when the texture should be visible. | Check shadow depth before repeating the same aim across the wall. |
| Mixed garden zone | Group fixtures by task: accent, path, wall and focal-point lighting. | Avoid making one fixture type handle every lighting layer. |
Mounting And Site Checks
| Check item | What to confirm | Why it matters |
|---|---|---|
| Ground condition | Soil firmness, planting depth, slope and drainage direction. | The spike position must stay stable after installation. |
| Aiming access | Whether installers can adjust the head after the fixture is placed. | Small aiming changes can strongly affect glare and focus. |
| Cable route | Route, connector location and possible maintenance access. | Early routing decisions reduce field changes. |
| Viewer position | Seating, windows, paths and main approach angles. | Accent lighting should highlight the target, not the viewer. |
| Nearby plants | Plant growth, trimming access and seasonal movement. | Landscape lighting changes as the landscape grows. |
Glare-Control Checklist
Glare control is a selection issue, not only an installation issue. Confirm it before the bill of materials is finalized.
| Risk | Common cause | Safer planning move |
|---|---|---|
| Bright point visible from seating | The fixture head is too exposed. | Move the aiming line, lower the intensity target or add shielding if available. |
| Uneven wall spot | The beam is too tight for the wall width. | Use a softer spread or more balanced placement. |
| Plant looks flat | The light is aimed straight at the front. | Try side aiming to create depth and texture. |
| Path feels harsh | An accent fixture is doing a path-lighting job. | Separate accent lighting from path safety lighting. |
| Neighboring zone looks patchy | One wattage and one beam are repeated everywhere. | Group fixtures by zone and target type. |
Buyer Inputs Before Selection
| Input | Useful detail | What it helps decide |
|---|---|---|
| Site photo | Day view plus the main viewing direction. | Fixture position and glare risk. |
| Target distance | Approximate distance from fixture to object. | Beam spread and output range. |
| Target size | Height, width and surface texture. | Whether one beam is enough. |
| Mounting zone | Ground, planter edge, wall base or hardscape joint. | Spike position and cable path. |
| Project files needed | Drawing, photometric file or product reference request. | Which confirmed version should be prepared. |
Compare Nearby Options
Use the 9W square garden spike page as a compact accent starting point. If the target is much smaller, compare compact square spotlights. If the target is larger or farther away, compare higher-output spike options in the same landscape family.
| Option | When to compare | Related path |
|---|---|---|
| 9W square garden spike light | Compact accents for planting beds, low walls and small trees. | Current page |
| 24W square garden spike page | When the target is larger or the throw distance is longer. | 24W square garden spike selection page |
| 36W square garden spike page | When a stronger square-head option needs comparison. | 36W square garden spike selection page |
| Compact square spotlight page | When the site needs a smaller square accent fixture. | Compact square spotlight guide |
| Outdoor spike light planning page | When the project needs stronger landscape projection. | Outdoor spike light planning page |
Common Selection Mistakes
| Mistake | Why it causes rework | Better check |
|---|---|---|
| Choosing by wattage first | The same wattage can look different with another beam or distance. | Start from target size and beam effect. |
| Ignoring glare direction | A good highlight can still be uncomfortable from seating or windows. | Mark viewer positions before aiming. |
| Using one beam across every zone | Trees, signs, walls and paths need different effects. | Group the layout by target type. |
| Confirming fixture style before mount | Ground and hardscape details may limit the final position. | Check the mounting zone and cable route together. |
| Waiting too long to request files | Project drawings and photometric data may depend on the final version. | List required files during selection, not after installation planning. |
Related Selection Pages
- Garden spike light category for nearby landscape accent options.
- Beam angle guide for beam and target matching.
- Compact flood and spotlight category for smaller accent comparisons.
- Landscape spotlight category for broader project planning.
- Download center for available project files.
- Contact Radiant Honor to confirm the selected configuration.
FAQ
Is this page a fixed datasheet?
No. This page is a selection guide for the existing 9W square garden spike route. Final optical, color, control and project-file details should come from the confirmed project configuration.
Where does a 9W square garden spike light fit best?
It is best considered for compact accents such as small trees, planting beds, low walls, signs, courtyard details and short-distance facade features.
How should beam planning start?
Start with target size, distance, mounting position and viewing direction. Then choose a beam effect that highlights the object without creating a harsh bright point.
What site information should be checked before selection?
Check ground condition, aiming access, cable route, drainage direction, viewer position, nearby plants and any file request needed by the project team.
When should a nearby wattage be compared?
Compare a lower option when the target is close or glare-sensitive. Compare a stronger option when the target is wider, taller or farther from the fixture.
How can glare be reduced during planning?
Control glare by adjusting position, aiming direction, beam spread and shielding options before repeating the fixture across the project.
What should buyers send for project confirmation?
Send site photos, target distance, target size, mounting zone, preferred lighting effect, quantity by zone and the project files needed for review.
